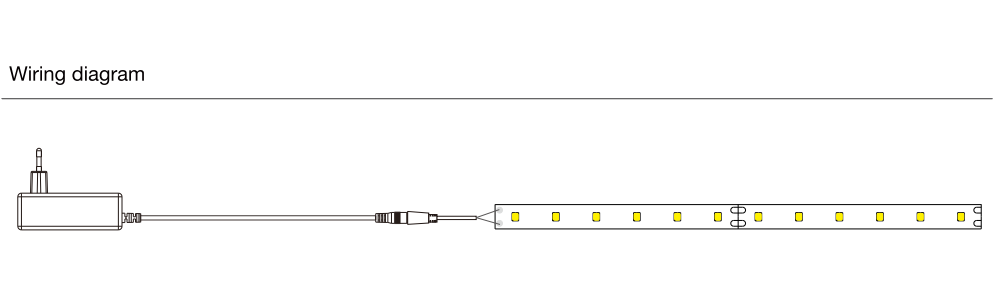
LED strip lights connect to power through a power supply or driver, which converts the alternating current (AC) voltage from the mains power source to the direct current (DC) voltage required by the LED strips. Here’s a step-by-step guide on how LED strip lights typically connect to power:
- Select the Right Power Supply:
- Calculate the total wattage required by multiplying the length of the LED strip (in meters) by the power consumption per meter (in watts). Check the specifications provided by the LED strip manufacturer for accurate power consumption details.
- Choose a power supply or driver that matches the voltage rating of your LED strip lights (commonly 12V or 24V) and provides sufficient wattage to power the total length of LED strips.
- Consider factors such as voltage stability, efficiency, and safety certifications (e.g., UL-listed) when selecting a power supply. Ensure it is designed specifically for low voltage DC applications to optimize performance and longevity.
- If uncertain about power supply selection, consult with the LED strip manufacturer or a qualified electrician to ensure compatibility and safety for DC low voltage applications.
- Prepare the Power Supply:
- Position the power supply unit in a well-ventilated area to prevent overheating. Avoid placing it in enclosed spaces or near heat sources to maintain optimal performance and reliability.
- Ensure that the power supply unit’s input voltage matches the voltage of the electrical outlet to which it will be connected. Use a grounded outlet and consider using surge protection to safeguard against voltage fluctuations.
- Verify that the power supply unit has the necessary protections, such as overvoltage protection (OVP), overcurrent protection (OCP), and short circuit protection (SCP), to ensure safe operation and protect both the LED strip lights and the power supply unit from potential damage.
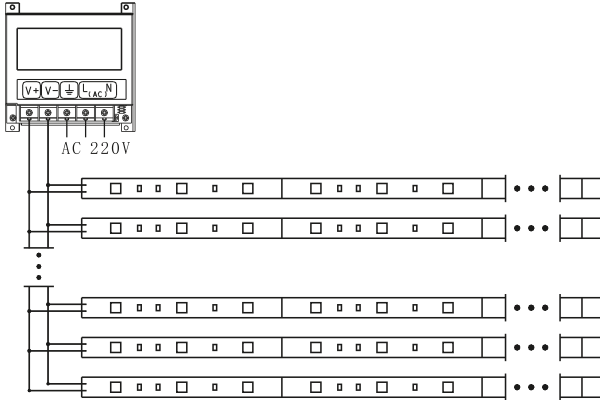
- Identify the Wiring:
- LED strip lights typically feature two wires for connection: a positive (+) wire and a negative (-) wire.
- The positive wire is commonly marked with a “+” symbol, color-coded red, or labeled accordingly to distinguish it from the negative wire, which is often marked with a “-” symbol, color-coded black, or labeled similarly for polarity identification.
- Ensure proper polarity identification, as incorrect wiring can damage the LED strip lights or cause them to malfunction. Use a multimeter set to measure DC voltage to verify polarity if necessary.
- Connect the Power Supply to the LED Strip Lights:
- Before making any connections, ensure that the power supply is unplugged to prevent electrical shock or damage to components.
- Use appropriate connectors, terminal blocks, or soldering techniques to establish secure electrical connections between the LED strip lights and the power supply. Follow the manufacturer’s recommendations for compatibility and installation instructions.
- Strip about 1/4 inch (6mm) of the protective coating from the end of the LED strip’s wires using wire strippers to expose the copper conductors. Be careful not to damage the conductors during the stripping process.
- Connect the positive (+) wire from the LED strip to the positive (+) terminal of the power supply unit and the negative (-) wire from the LED strip to the negative (-) terminal of the power supply unit. Ensure tight and secure connections to prevent loosening or disconnection over time.
- If soldering is required, use a soldering iron with the appropriate temperature setting to solder the wires to the terminals or connectors. Apply solder to the connections evenly and allow them to cool before handling.
- Test the Connection:
- Before permanently mounting the LED strip lights, temporarily power them on to verify that the connections are correct and the lights illuminate as expected.
- Inspect the entire length of the LED strip lights to ensure uniform brightness and proper functionality. Check for any flickering, dimming, or color inconsistencies that may indicate wiring issues or defective components.
- If troubleshooting is necessary, disconnect the power supply and double-check the wiring connections, ensuring that all terminals are securely fastened and properly aligned.
- Secure the Connection:
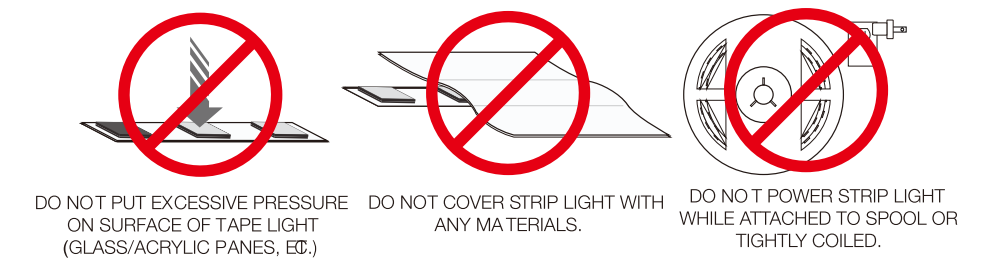
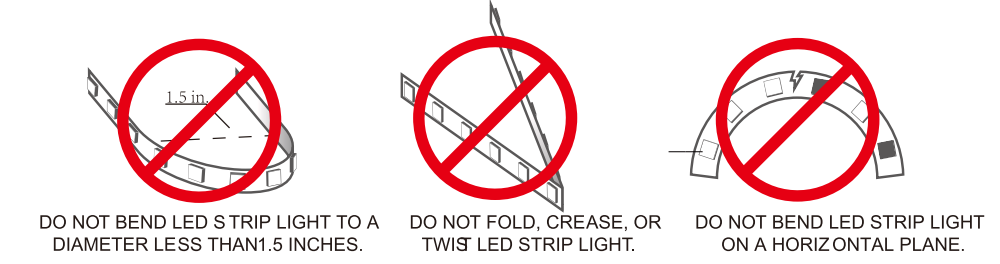
- Use cable ties, adhesive-backed cable mounts, or cable management channels to secure and organize the wiring along the installation route. Avoid excessive tension or bending of the wires, which could damage the insulation or solder joints.
- Apply silicone sealant or electrical sealant around the wire connections and solder joints to protect them from moisture, dust, and corrosion, particularly in outdoor or damp environments.
- Routinely inspect the wiring and connections for any signs of damage, wear, or loosening, especially in high-traffic areas or environments with temperature fluctuations.
- Mount the LED Strip Lights:
- Clean the mounting surface thoroughly with isopropyl alcohol or a mild detergent solution to remove any dirt, grease, or residue that could hinder adhesion.
- Allow the mounting surface to dry completely before applying the adhesive backing of the LED strip lights to ensure maximum adhesion strength.
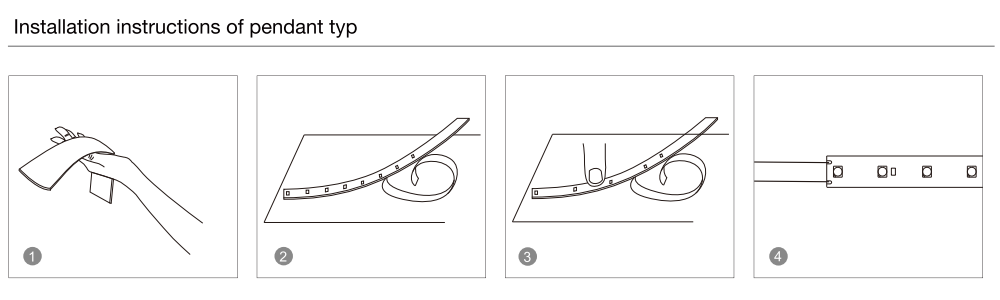
- Press the LED strip lights firmly onto the mounting surface, applying even pressure along the entire length to ensure uniform contact and adhesion. Use a roller or flat object to smooth out any air bubbles or wrinkles in the adhesive backing.
- For overhead installations or vertical surfaces, use additional adhesive support such as mounting clips, brackets, or adhesive-backed aluminum channels to prevent sagging or detachment over time.
- Optional: Use Accessories:
- Consult the manufacturer’s instructions and wiring diagrams for any additional accessories such as connectors, extensions, amplifiers, dimmers, or controllers designed specifically for use with DC low voltage LED strip lights.
- Ensure that the accessories are compatible with both the LED strip lights and the power supply unit in terms of voltage, current, and signal protocols (e.g., PWM, SPI) to avoid compatibility issues or electrical damage.
- Follow the recommended installation procedures and wiring configurations provided by the manufacturer to prevent issues such as signal interference, voltage drop, or premature failure of components.
- Test the functionality of the accessories after installation to verify proper operation and integration with the LED strip lighting system.

By following these detailed steps and precautions tailored specifically to single white color LED strip lights with DC low voltage, you can safely and effectively connect them to power, ensuring reliable performance and longevity for your lighting installation.