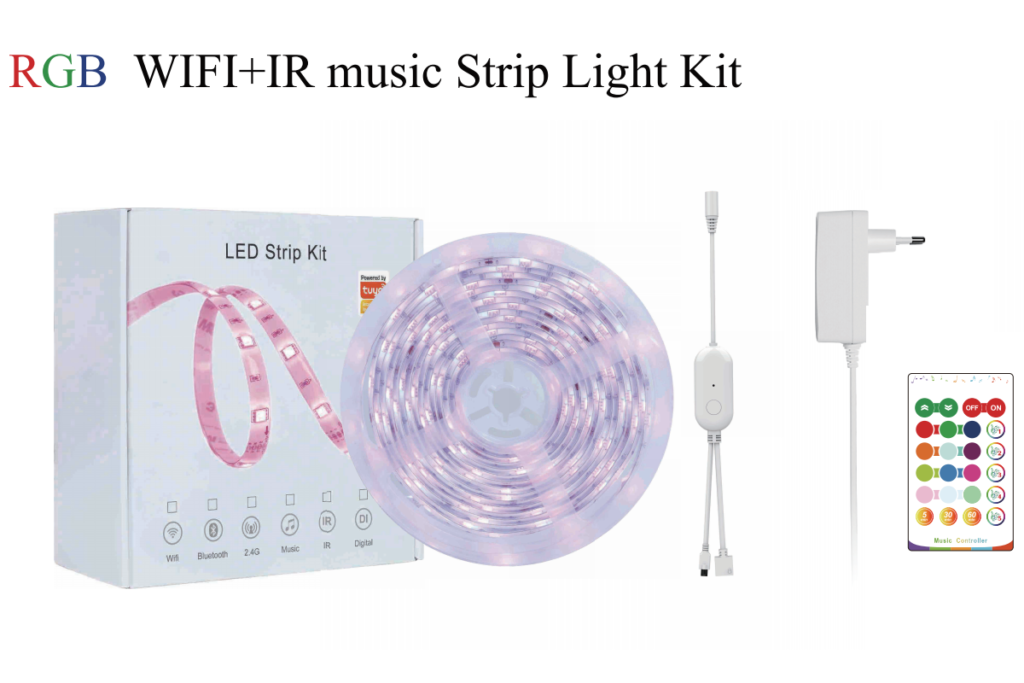
Let’s delve deeper into each step of connecting RGB LED strip lights, power, and an RGB IR controller after cutting them:
- Select the Right Power Supply:
- Calculate Wattage Requirement: Measure the total wattage needed by multiplying the length of the RGB LED strip (in meters) by the power consumption per meter (in watts). Account for any additional power requirements, such as for amplifiers or controllers.
- Voltage Compatibility: Ensure the power supply matches the voltage requirements of the RGB LED strip lights. Common voltages are 12V or 24V. Using an incorrect voltage can damage the LEDs.
- Current Capacity: Choose a power supply that can deliver the required current to the LED strip lights without overheating or voltage drop. Check the current rating (in amps) of both the LED strip lights and the power supply.
- Safety Features: Look for power supplies with built-in protections such as overvoltage protection (OVP), overcurrent protection (OCP), and short circuit protection (SCP) to safeguard the LED strip lights and the power supply itself.
- Prepare the Power Supply:
- Ventilation: Place the power supply in a well-ventilated area to prevent overheating. Ensure there is sufficient airflow around the power supply to dissipate heat effectively and prolong its lifespan.
- Input Voltage: Verify that the power supply’s input voltage matches the voltage of the electrical outlet. Use a grounded outlet and consider using surge protection to safeguard against voltage fluctuations.
- Protection Features: Confirm that the power supply unit has the necessary protections to prevent damage to both the LED strip lights and the power supply unit. This includes overvoltage protection, overcurrent protection, and short circuit protection.
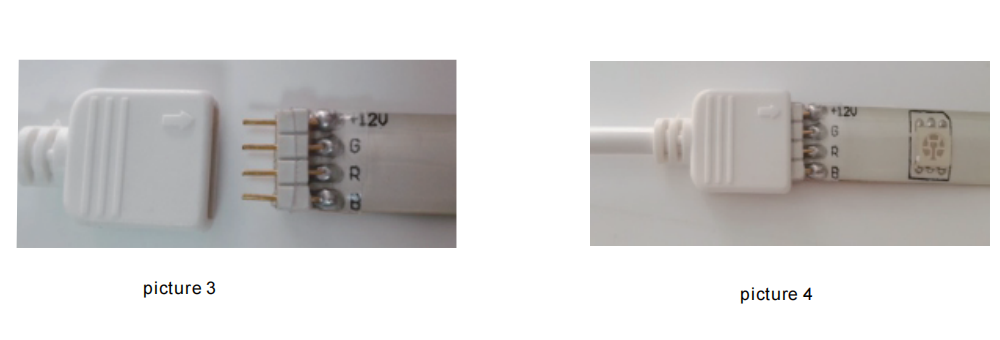
- Identify the Wiring:
- Wire Configuration: RGB LED strip lights typically have four wires: one common anode (+) wire and three cathode (-) wires for each color channel (red, green, and blue).
- Polarity Identification: Differentiate between the common anode wire and the cathode wires. The common anode wire may be marked differently or colored differently from the cathode wires. Ensuring correct polarity is crucial for proper functioning of the LED strip lights.
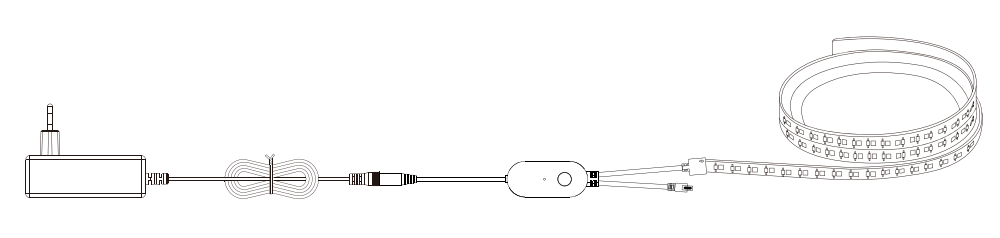
- Connect the Power Supply to the RGB LED Strip Lights:
- Cutting the Strip: Use sharp scissors or wire cutters to cut the RGB LED strip lights at designated cutting points. Ensure you cut along the marked lines to avoid damaging the circuitry.
- Stripping the Ends: Strip about 1/4 inch (6mm) of the protective coating from the end of the RGB LED strip’s wires using wire strippers. This exposes the copper conductors for connection.
- Making Connections: Connect the common anode wire (+) from the RGB LED strip to the positive (+) terminal of the power supply unit. Secure the connection using appropriate connectors, terminal blocks, or soldering techniques.
- Connecting Cathode Wires: Connect each of the three cathode wires (-) from the RGB LED strip to the negative (-) terminals of the power supply unit for the red, green, and blue color channels. Ensure tight and secure connections to prevent loosening or disconnection over time.
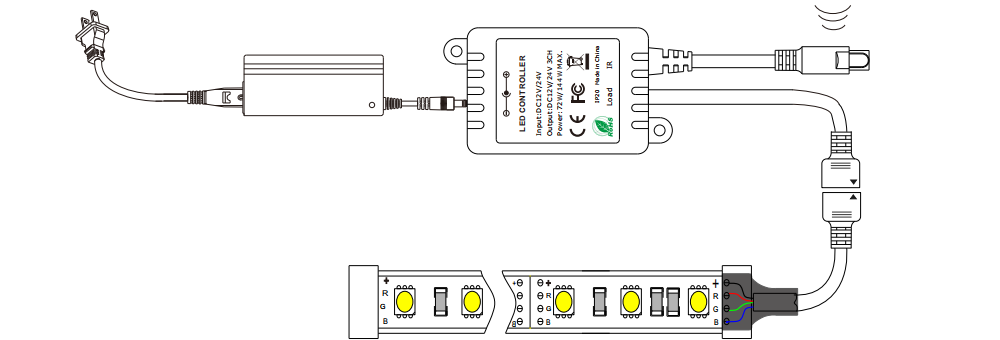
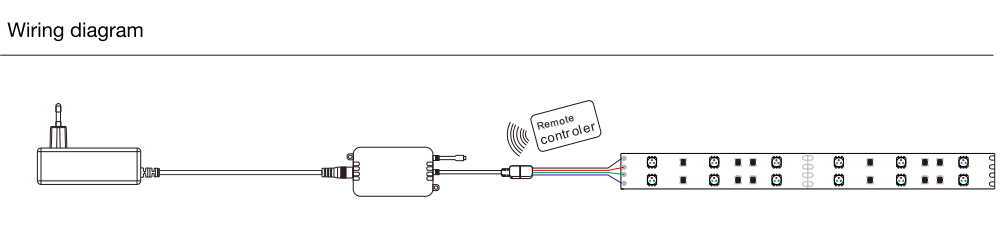
- Connect the RGB IR Controller:
- Terminal Identification: Identify the input and output terminals on the RGB IR controller. These are usually labeled “Input” and “Output” respectively.
- Output to LED Strip: Connect the output terminals of the RGB IR controller to the corresponding input terminals on the RGB LED strip lights. Match the color channels (red, green, and blue) to their respective terminals.
- Secure Connections: Ensure the connections are secure and properly aligned to prevent signal loss or interference. You can use connectors or soldering methods for this step as well.
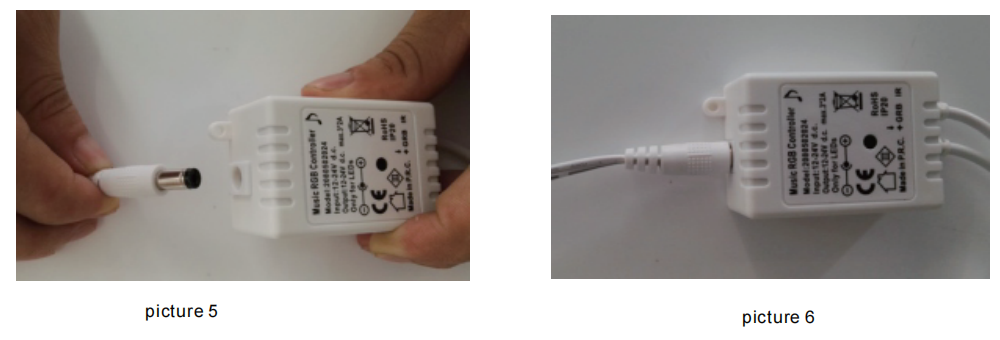
- Connect the Power Supply to the RGB IR Controller:
- Power Input: Connect the output terminals of the power supply to the input terminals on the RGB IR controller. Make sure the polarity of the connections matches between the power supply and the controller.
- Secure Connections: Use appropriate connectors or soldering techniques to create secure connections. Double-check the connections to ensure they are tight and properly aligned.
- Test the Connection:
- Power On: Plug in the power supply and turn it on to test the connection. Ensure that the RGB IR controller is also powered on.
- Functionality Check: Use the remote control or interface provided with the RGB IR controller to cycle through different colors and lighting effects. Test each color channel (red, green, and blue) individually to verify proper function.
- Troubleshooting: If any issues are encountered, double-check all connections and ensure they are secure and properly aligned. Troubleshoot any wiring problems or configuration issues as needed.
By following these detailed steps, you can safely and effectively connect RGB LED strip lights, power, and an RGB IR controller after cutting them, enabling customized lighting effects and control for your space.